Parts
The engine needs a constant supply of fuel – the parts involved are marked on this picture of the dismantled carburettor:
- fuel tap
- float bowl
- float
- float valve
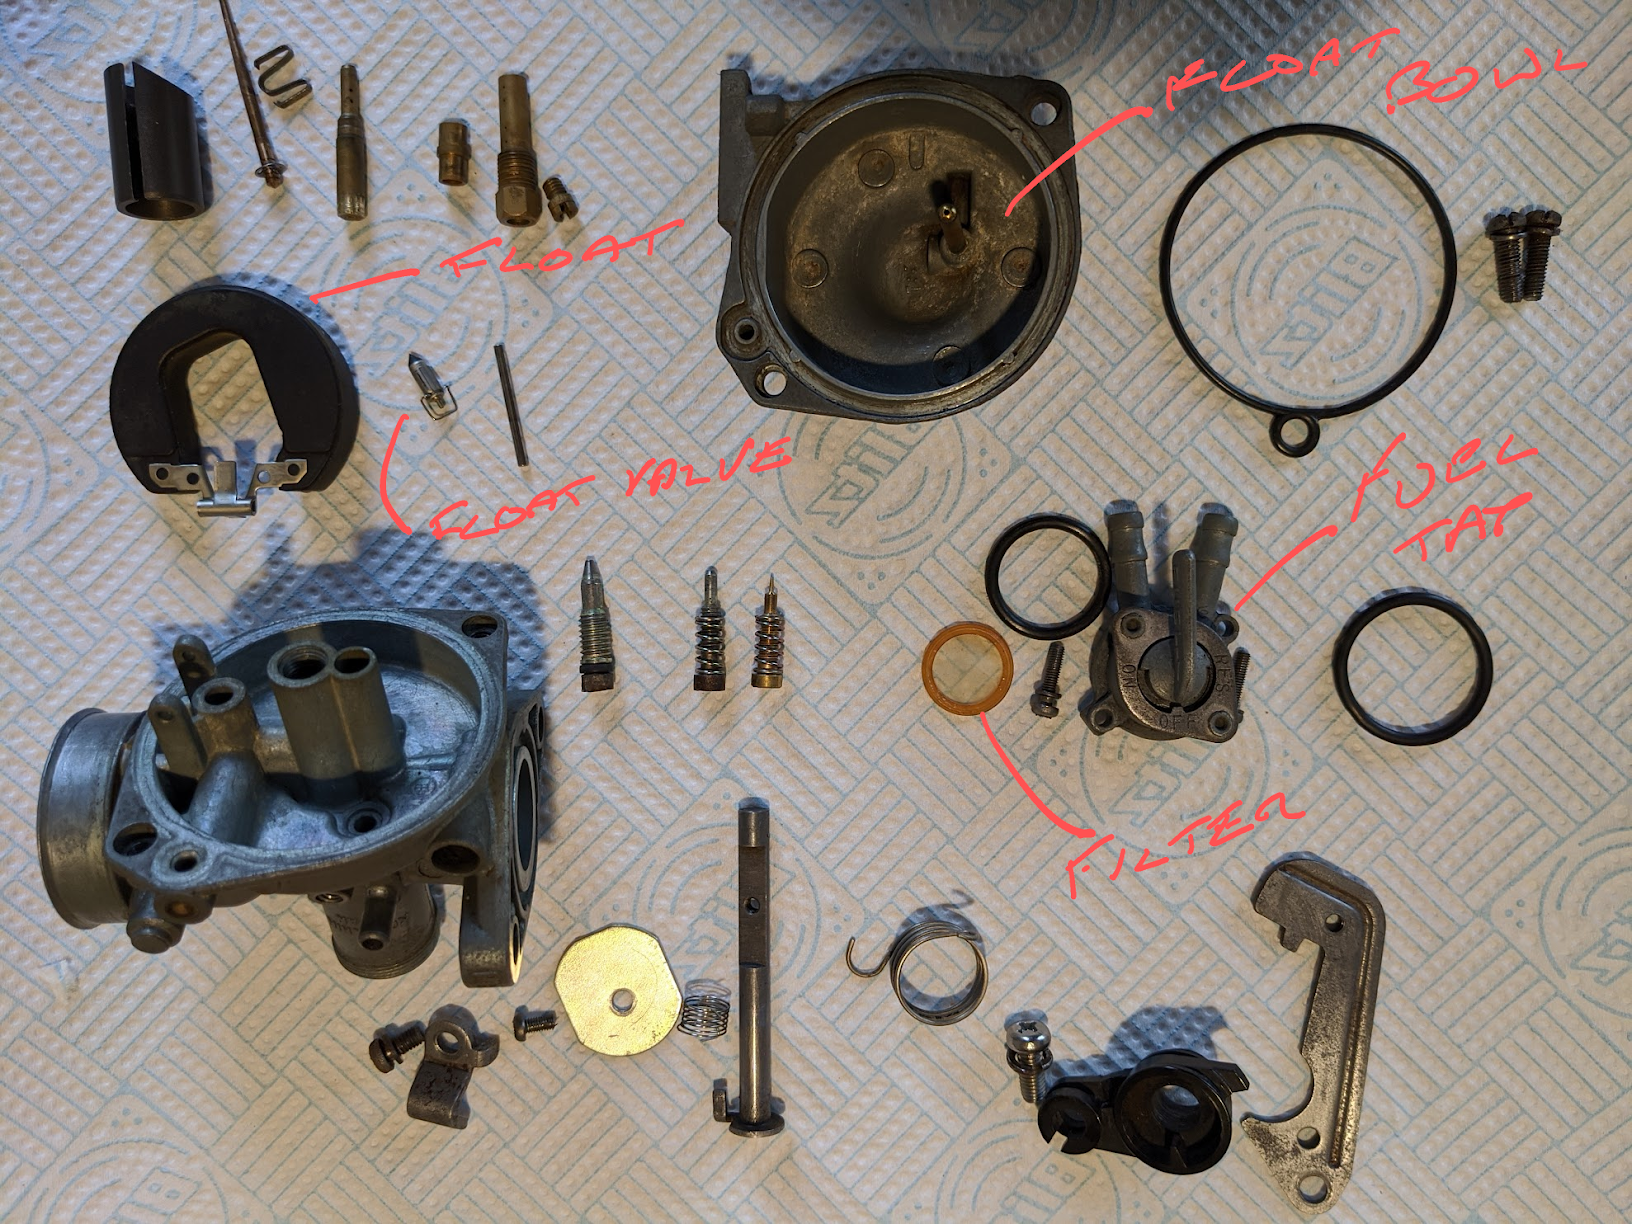
A fully dismantled PB25A
Fuel supply
The fuel is fed to the tap by gravity from the tank where:
- It passes through a filter and up through the hole marked with the arrow A in the picture below.
- From there the fuel enters the top part of the carburettor, which contains a hole corresponding to the one below, and along the horizontal channel marked by B
- Finally the fuel enters vertical channel C and pours into the bowl below.
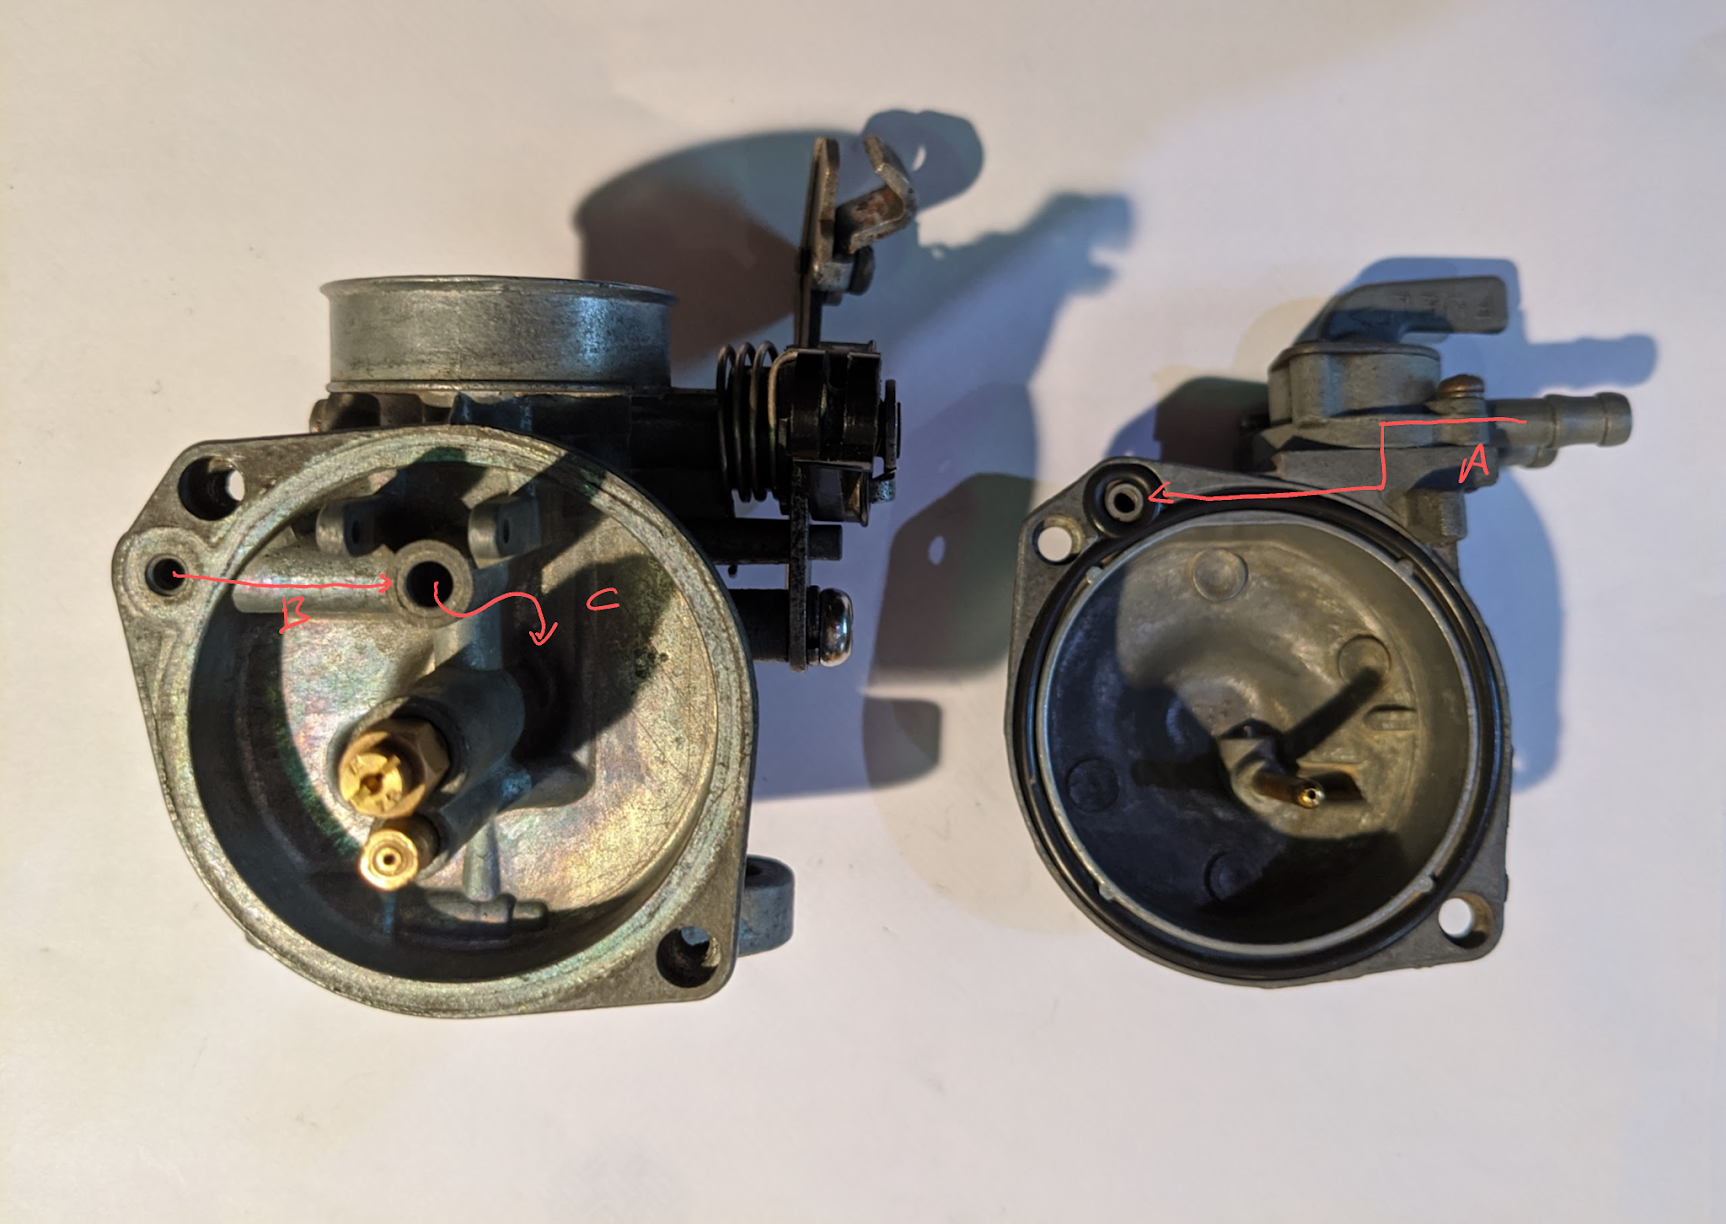
note the top half of the carb (left) is upside down in this picture
What stops the bowl over filling? The float and float valve. edit : after reading an article by Mike Dixon, I realised that this is not the correct way to describe what the float is for. It's actual purpose is to maintain the fuel level at a point that is appropriate for the fuel air mixture required by the engine (see the section on float height below)
The float works like the ballcock in a toilet cistern: as fuel enters the chamber the float rises and the needle is pushed up into a brass seat installed in the carburettor body, and this stops the flow of fuel. When the fuel level drops the float falls, pulling the needle away from the seat so more fuel flows into the chamber.
Here is the float valve, float and the rod the float pivots on:
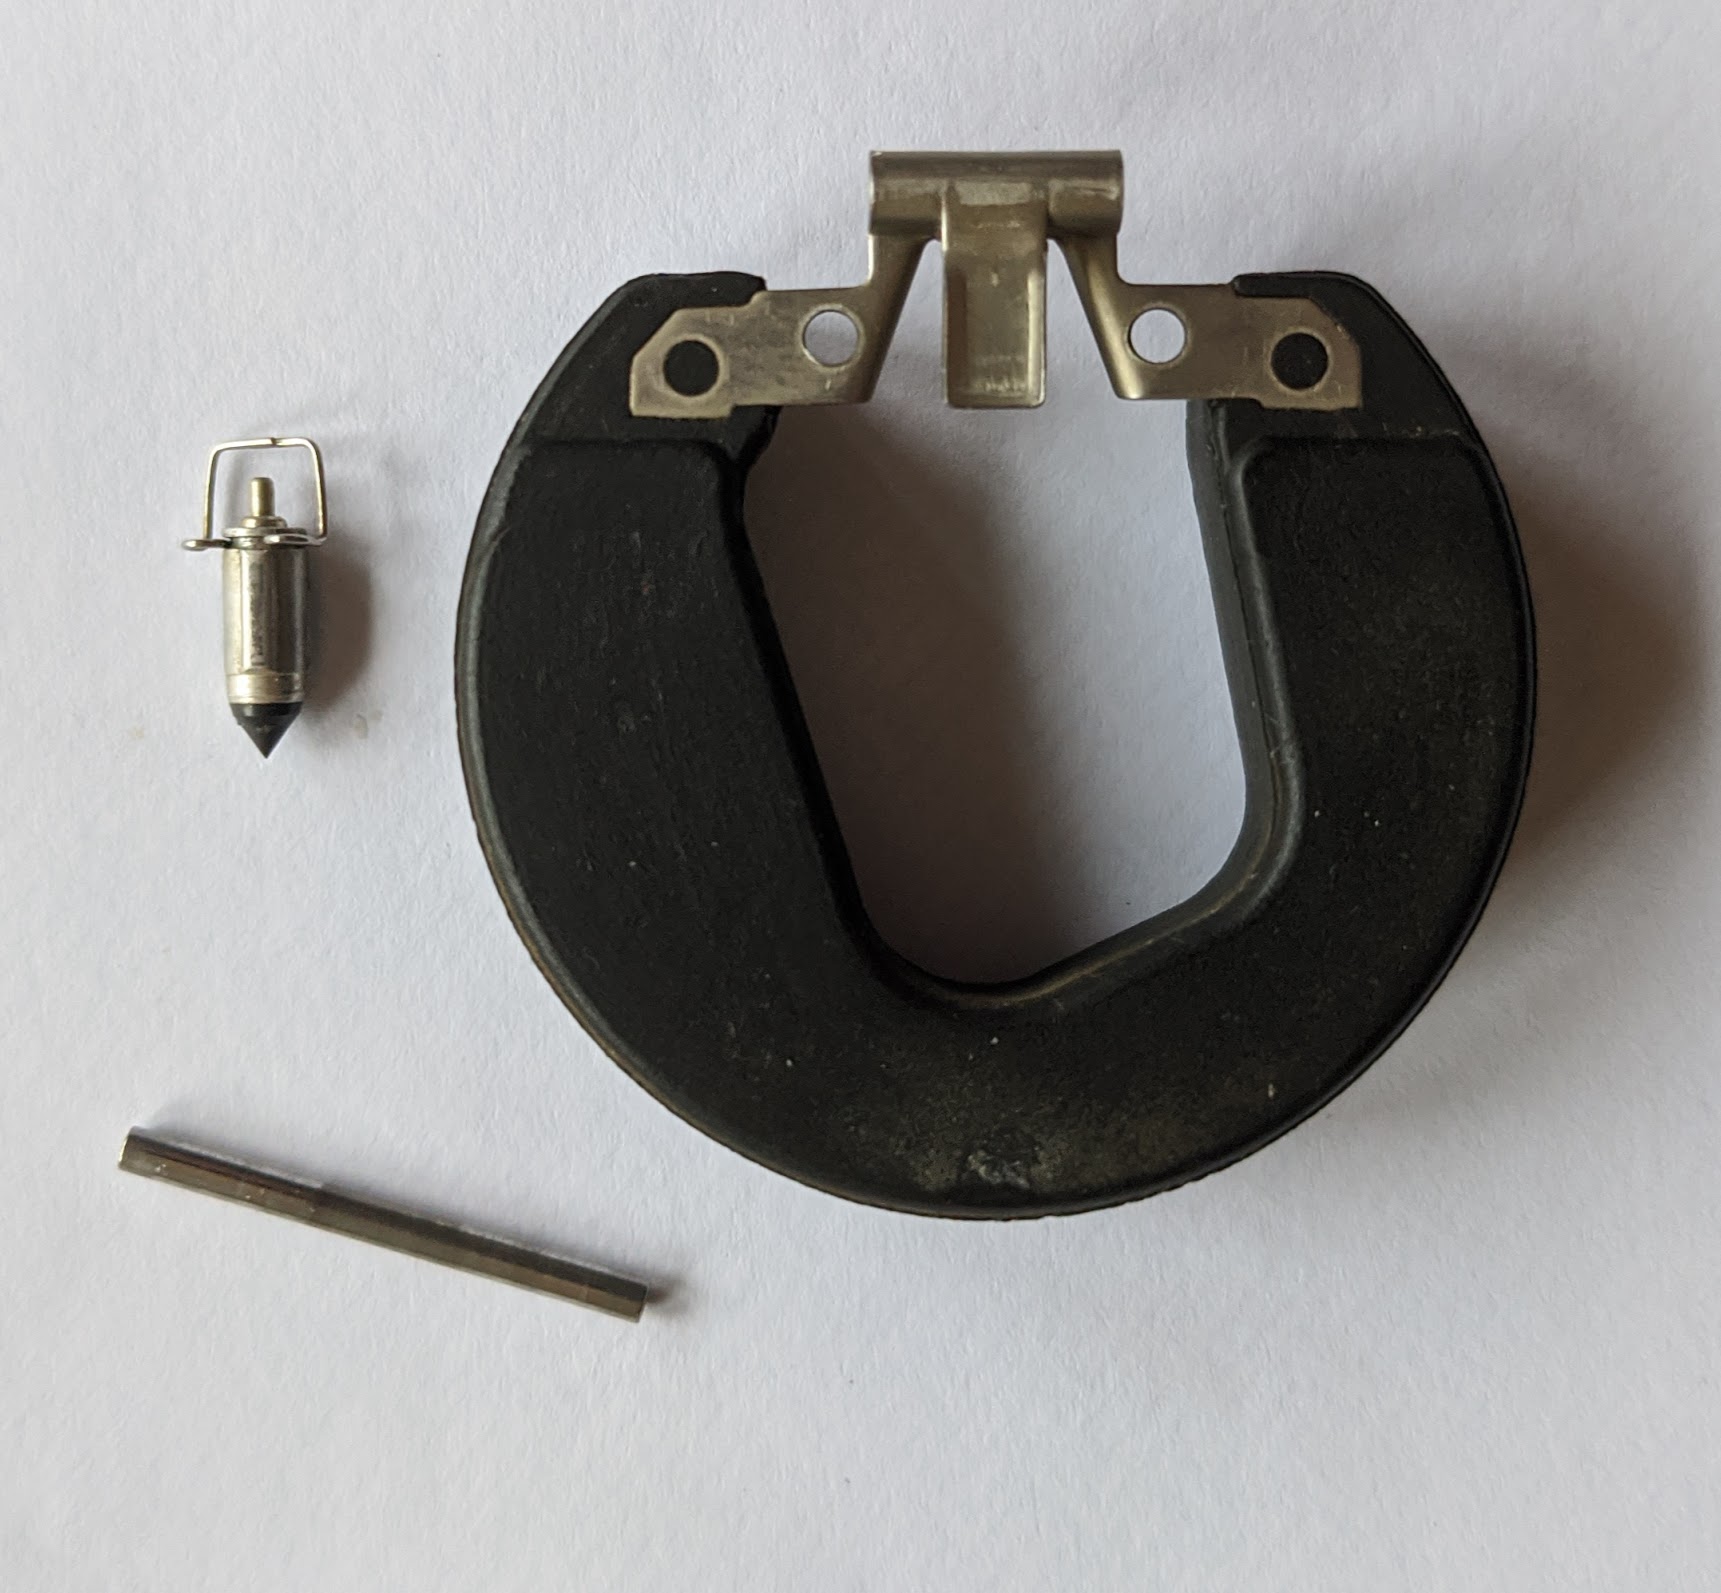
Float valve
This part is sometimes referred to as the float needle or float needle valve but, as we shall see, there are other “needle” parts in the carburettor, so to avoid confusion we’ll just stick to float valve.
The original Keihin float valves for the C90z carburettor have a tip made from Viton (a trade name for chemically resistant synthetic rubber). Viton is often used to make o-rings and the like since it is soft and malleable allowing it to deform and make a good seal even on imperfect surfaces. There is a little spring loaded pin on the end of the valve that acts as a shock absorber (unlike the valve in your toilet, this valve needs to work while being continually jiggled and bounced around on the bike).
Replacement parts
Having a vague idea that the poor running of my c90 might require some new carburettor parts I had already ordered a cheap IMPEX repair kit.
As you can see in the picture below, the repair kit part is not very good, so I ordered a genuine one from Honda one to do a comparison. The (much) cheaper IMPEX part is hopeless: the chrome coating is flaking off in places; the rubber tip is off centre and has an uneven finish. Finally the hole for the spring loaded pin is not drilled correctly and the pin therefore fits at a jaunty angle.
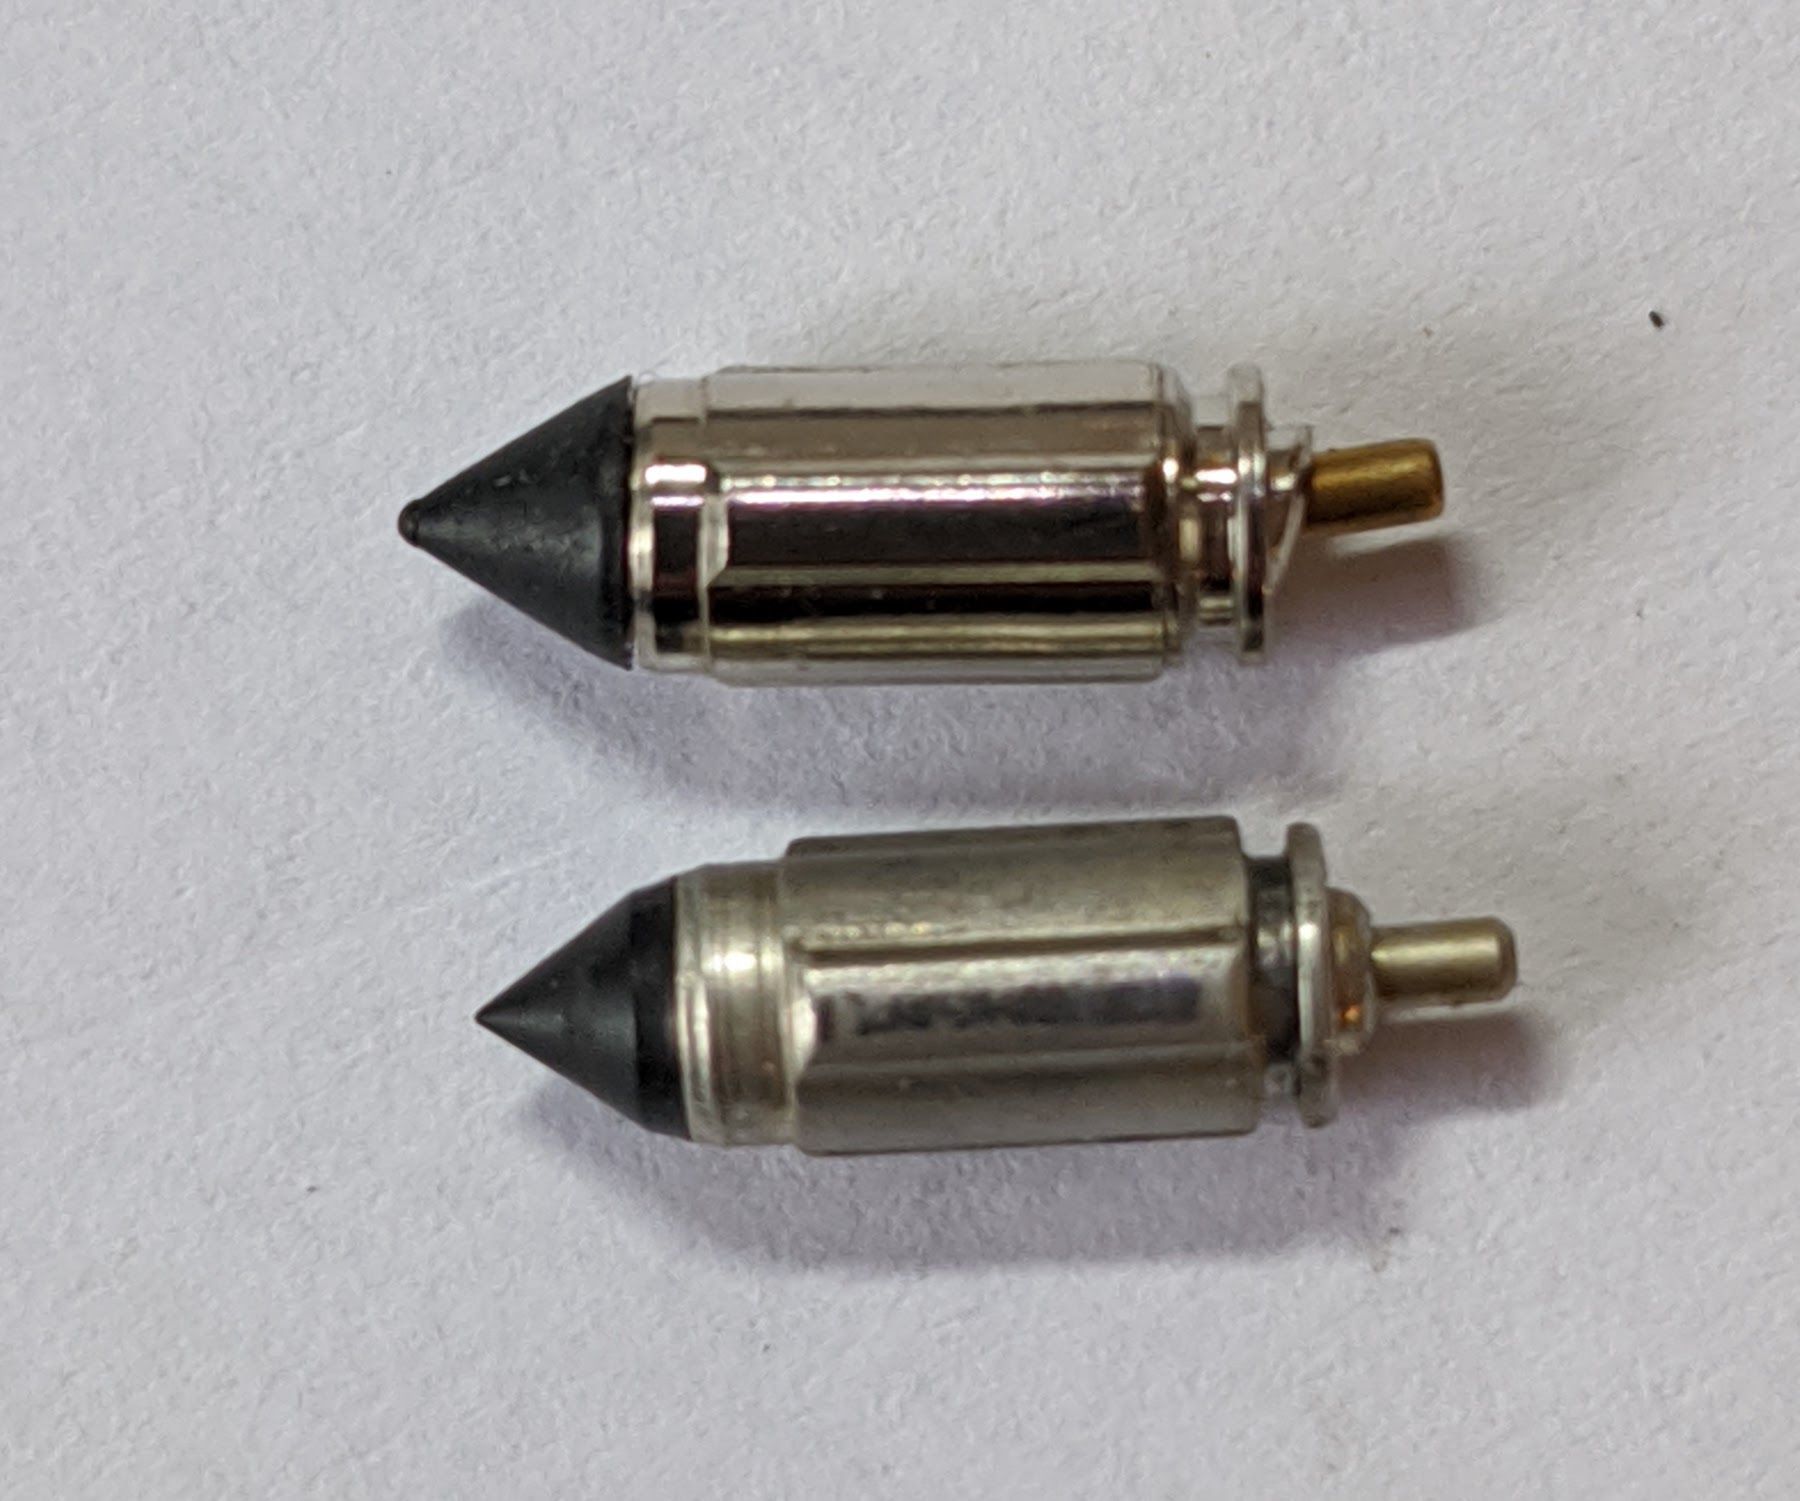
This is a part that does wear over time, and an indentation can develop where the tip contacts the seat. You can just see a small ring is developing on the float valve that was fitted to my bike.
For such a tiny part they are very expensive, but the consensus is that it is best not to skimp on it given the headaches caused when it does not perform correctly (more on that here).
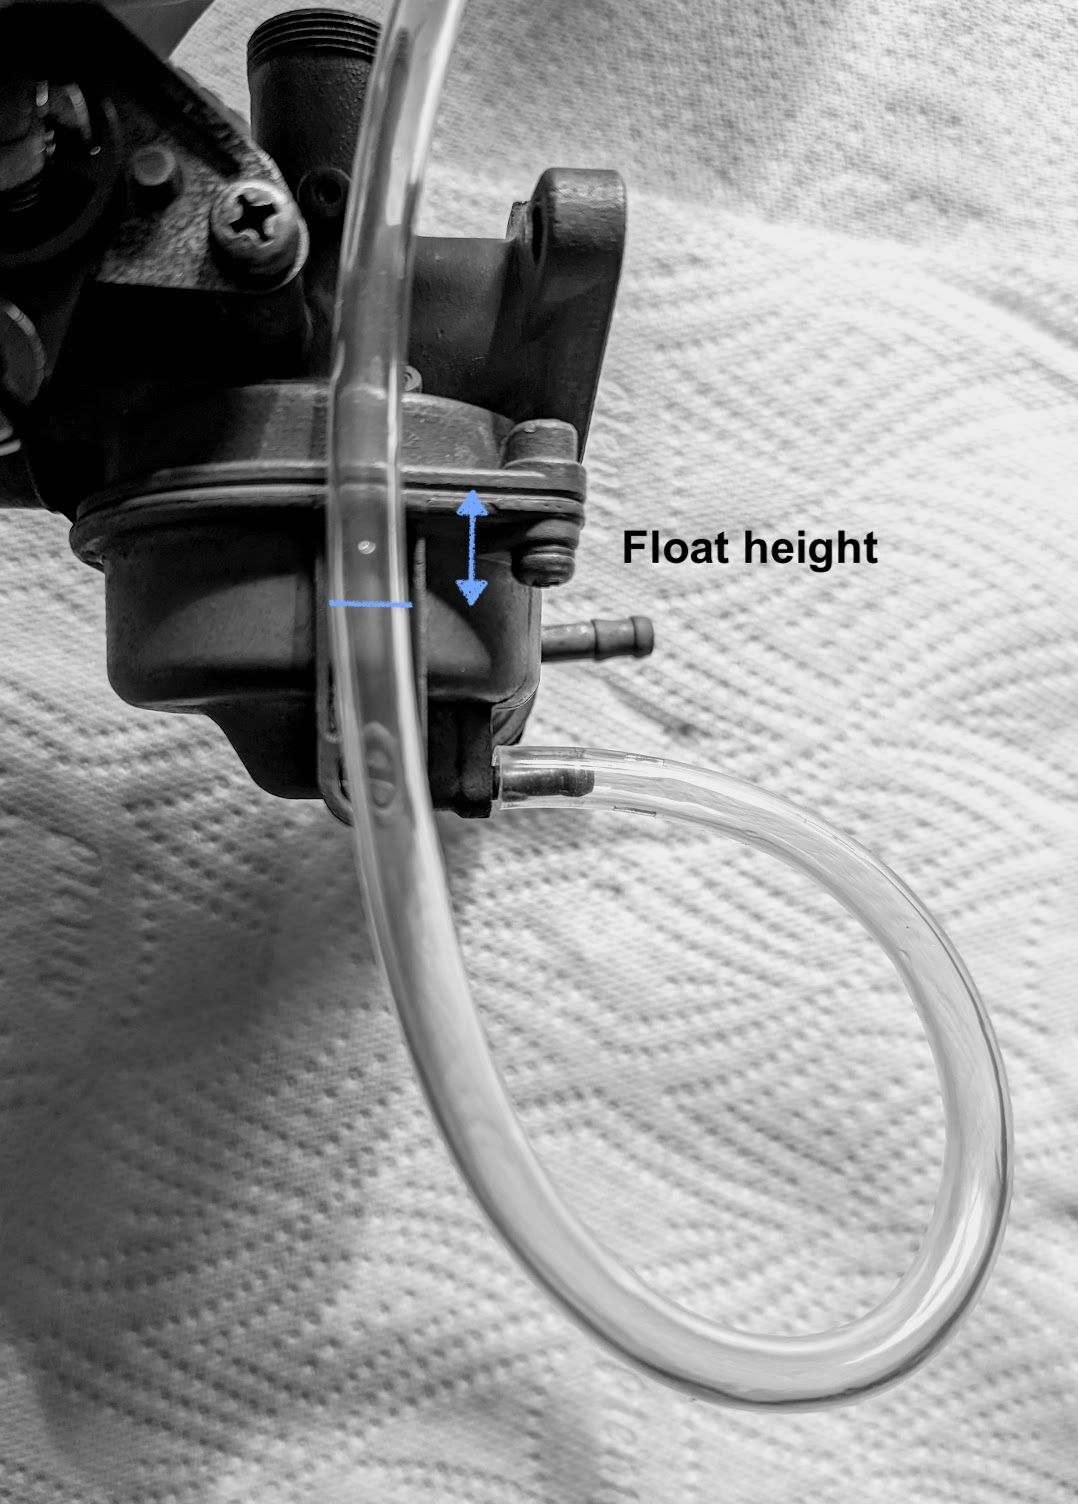
Float height
The level of fuel in the float chamber has an important effect on how the engine runs since it effects the ratio of fuel and air passed to the engine: when the level is too high the additional pressure exerted by the higher volume of fuel in the chamber means that it is delivered faster and the mixture becomes richer, when it is too low the mixture is made correspondingly lean.
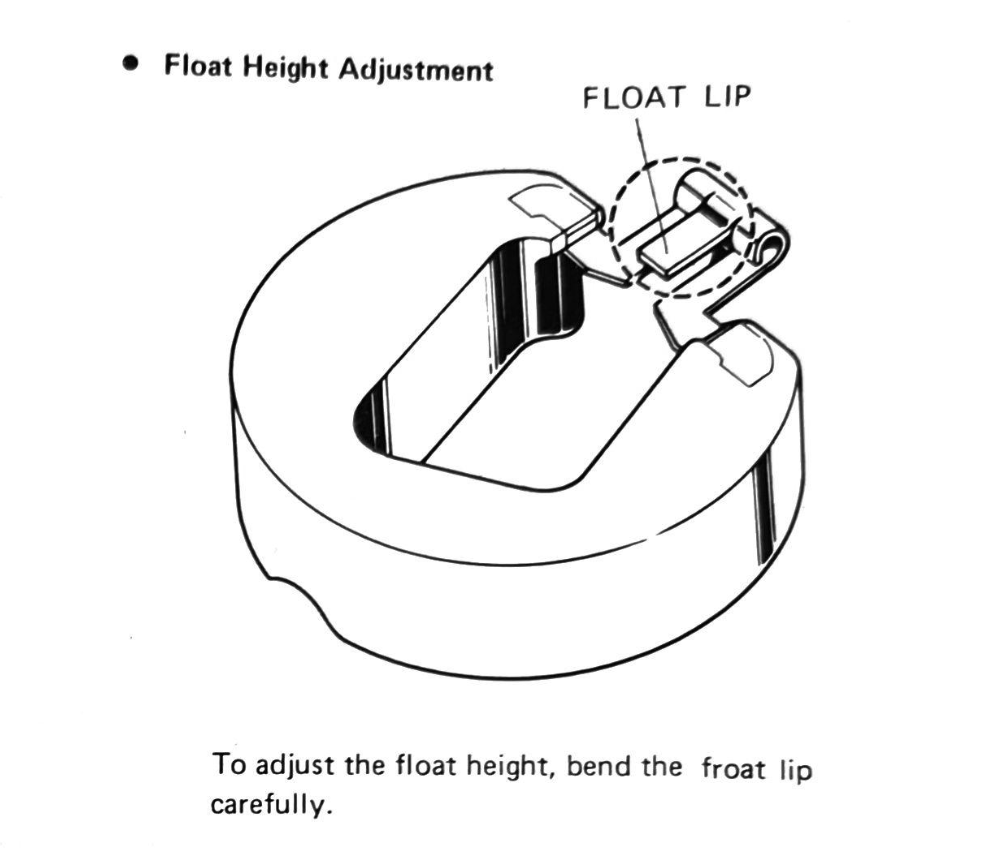
Honda supply instructions for checking and modifying the float height:
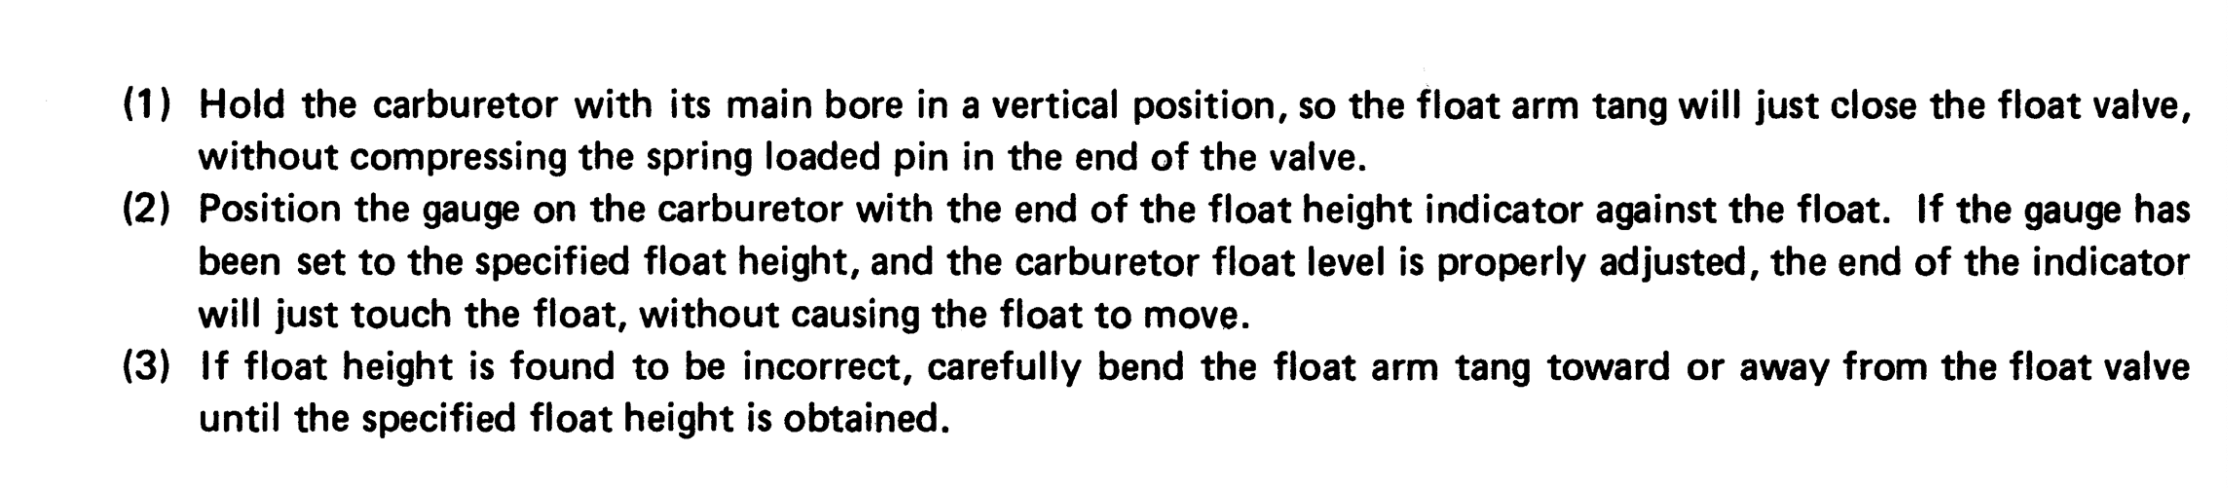

Given that the correct float height is set at the factory, and that there is no obvious way for it to go out of adjustment in normal use, it is perhaps surprising that Honda give instructions on how to check and correct it.
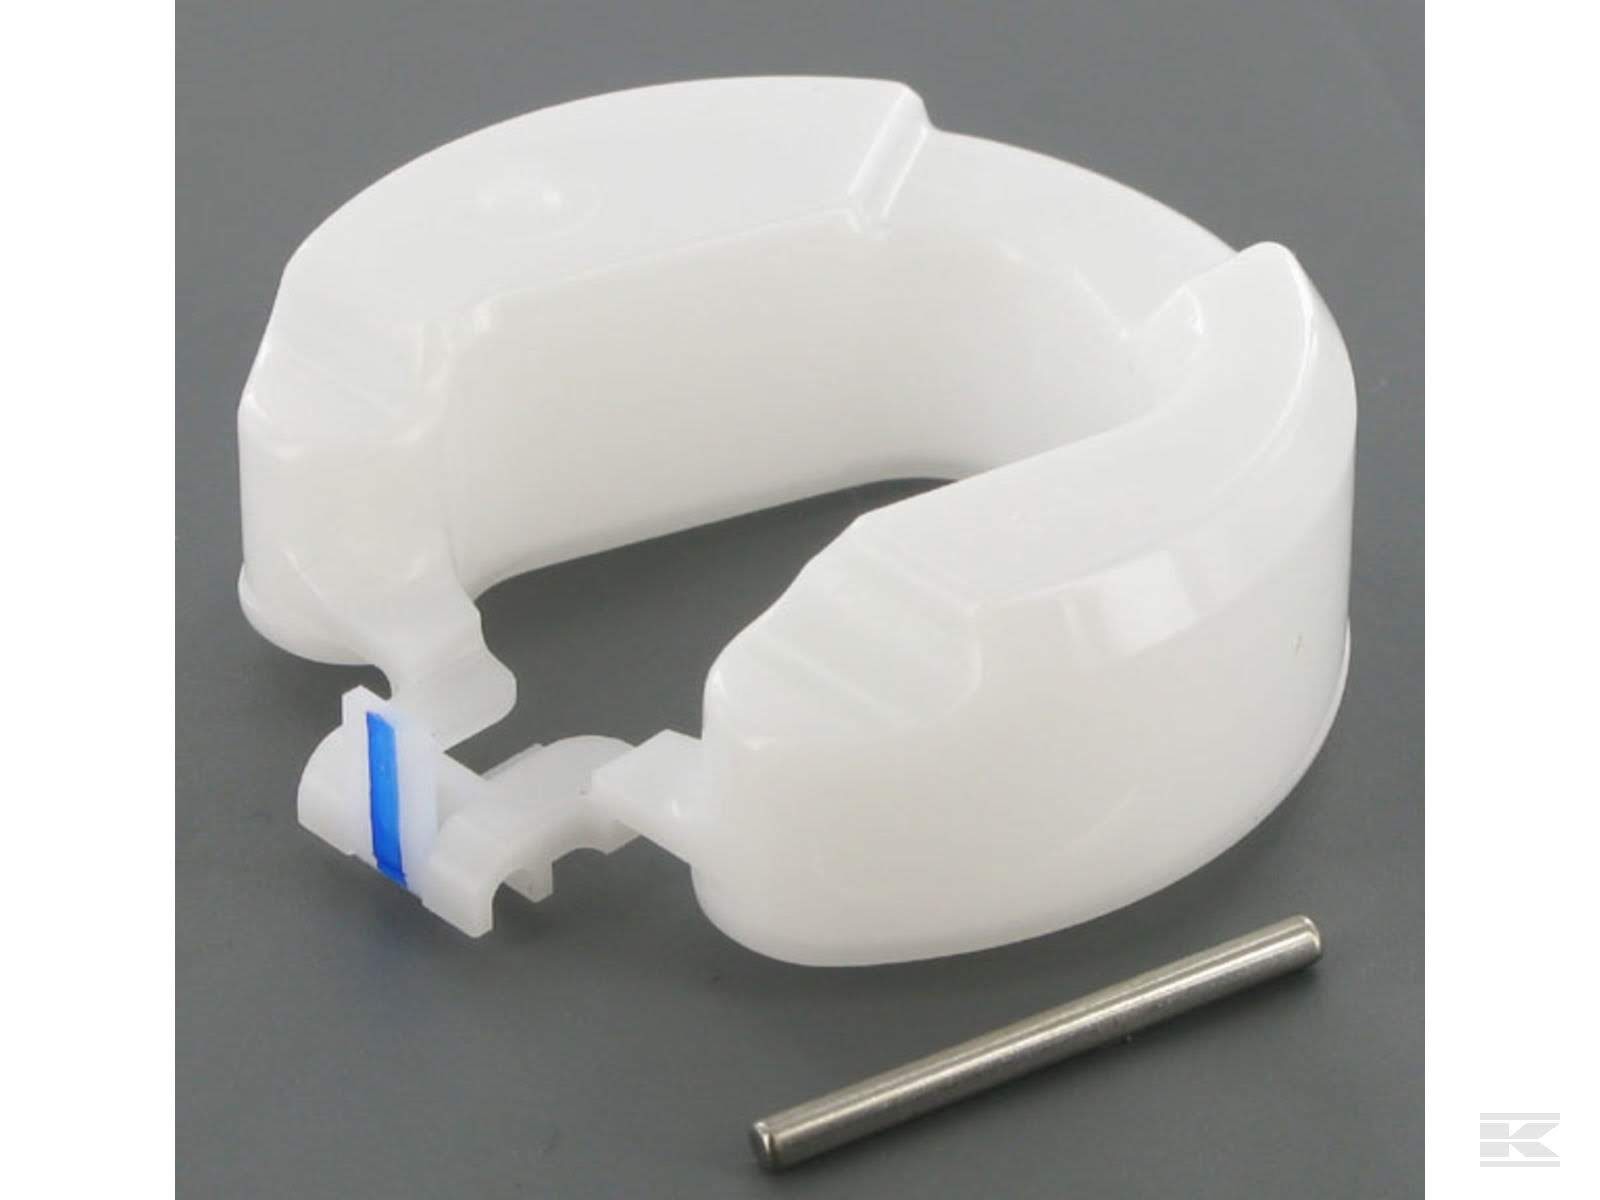
One possibility explanation is that owners adjust the height to compensate for some other problem, the obvious one being that the wear on tip of the float valve causes the float to rise higher before the valve can seal off the flow of fuel. In this case It might be tempting – in order to avoid buying a new float valve – to bend the float tab to get back to the correct fuel level.
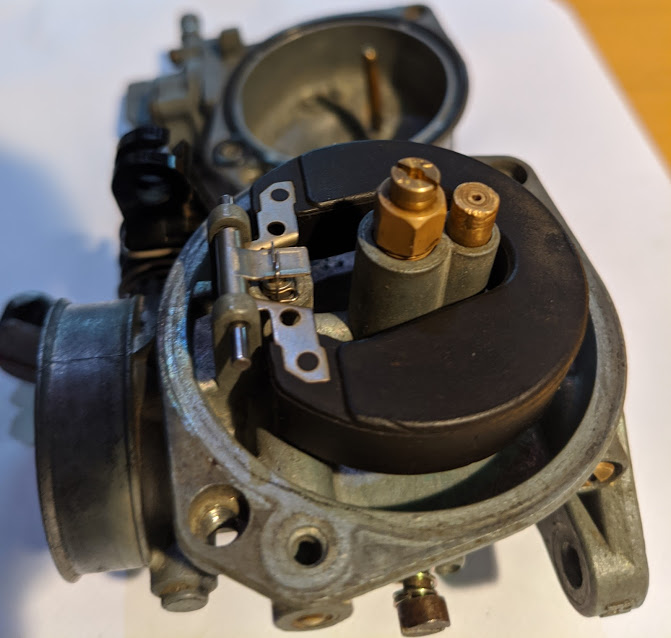
It appears Honda eventually thought better of this and started to supply one piece plastic floats that do not allow for this kind of adjustment:
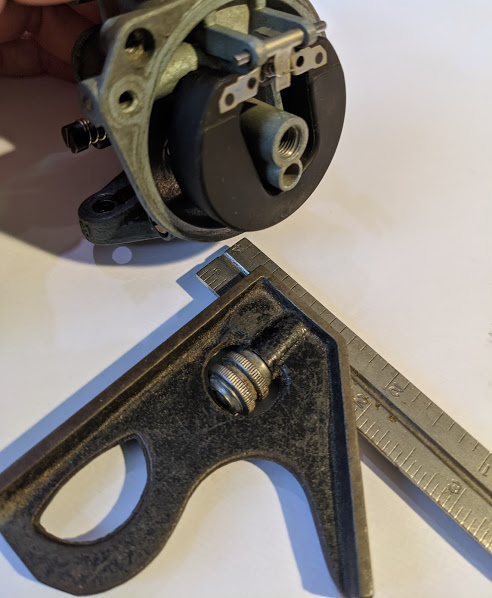
Anyhow, if you do want to measure the float height there are a couple of ways of doing it:
With a float gauge (I improvised with a small combination square):
Alternatively you can attach a transparent tube to the drain nozzle to see the actual level of fuel in the float chamber – I don't know how accurate this would be as the float will be partially submerged, but it is at least handy as it can be done while the carburettor is still on the bike.
I can't find a workshop manual that covers the PB25a carburettor, but the height given in the Haynes manual is 10mm[2]. Note that the carb described in the 1971 manual (PW15 HA1) has a brass float and the float height is specified as 21mm. Possibly there were other variations in the interim, so you may need to experiment.
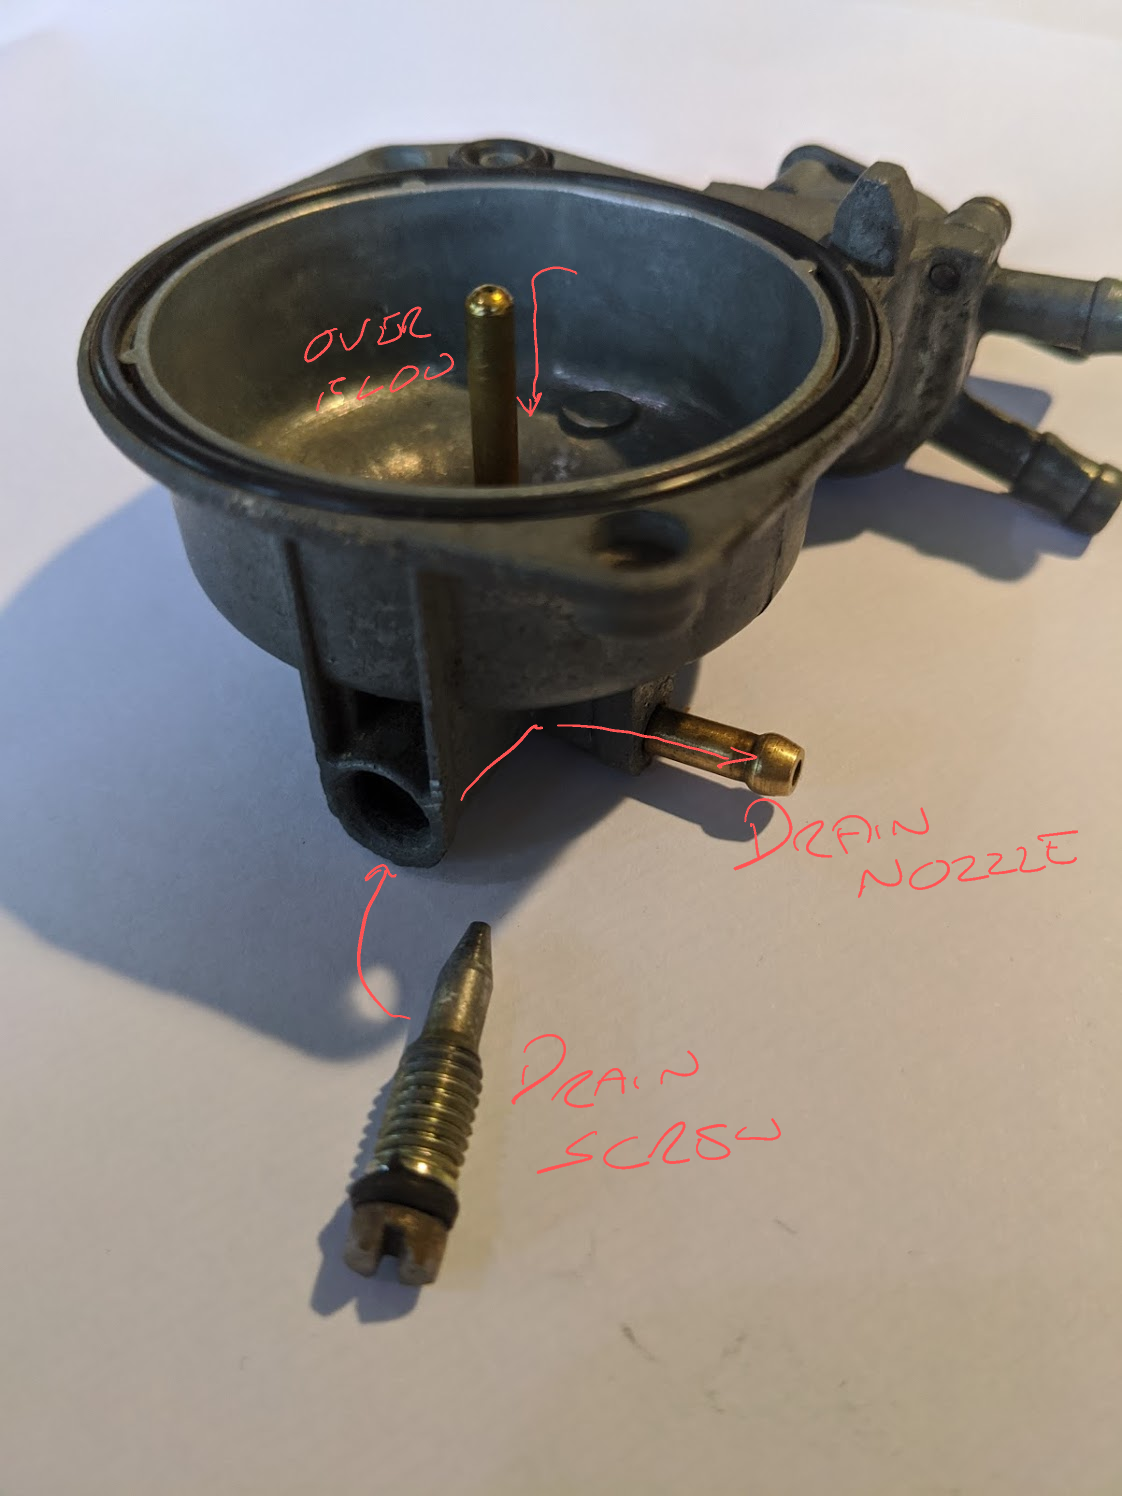
Drain, overflow & breather tube
There are a few other bits involved with the carburettor: the overflow, drain screw and breather
The purpose of the drain screw is self explanatory: when it is screwed in place it blocks a small hole in the base of the carburettor and when it is loosened fuel drains out of the nozzle shown in the picture below:
In the event that the float valve is not sealing properly, or the float has got stuck, then the fuel level will rise until it reaches the top of the overflow tube where it will then come out via the drain nozzle.
If the leak fills the chamber faster than it can be drained off via the overflow, say because the overflow is blocked (the hole is rather small, I think to limit the amount of fuel that might otherwise splash out as you go over bumps in the road) then fuel can fill the float bowl and overflow into the venturi above. If this happens fuel can find its way down the intake manifold to the cylinder, past the cylinder rings and into the engine beneath where it mixes with the engine oil[1].
The nozzle shown below is a breather vent and is connected by a channel to the top of the float bowl:
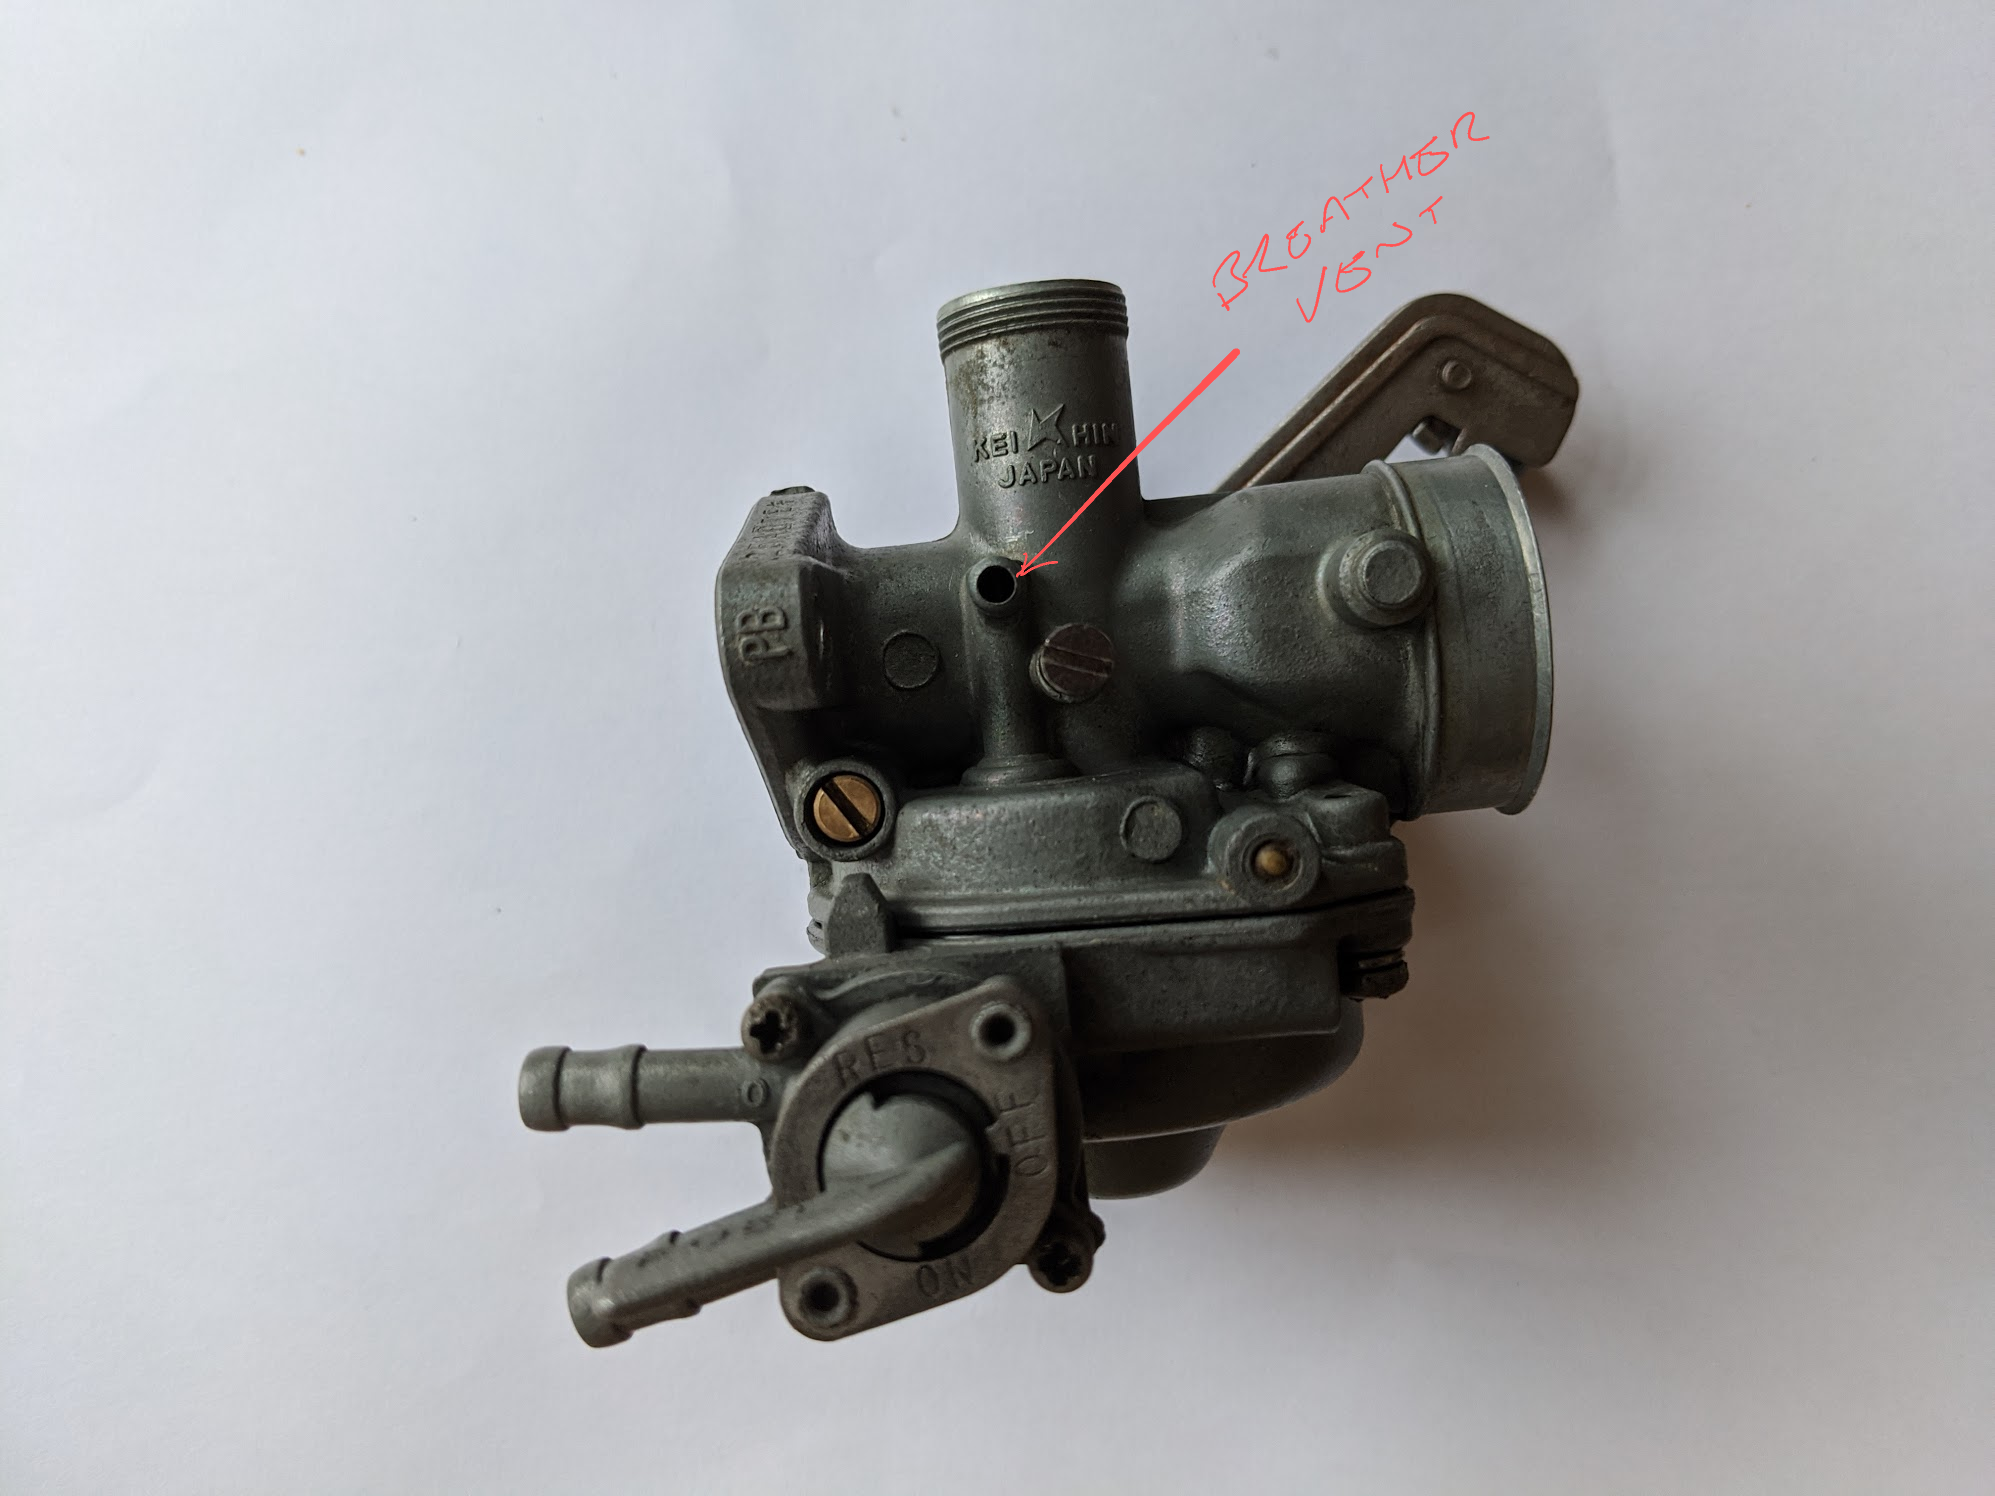
As we saw earlier, the carburettor works because of the difference in air pressure between the bowl and the lower pressure caused by the fast moving air in the venturi – the breather vent helps maintain atmospheric pressure in the float bowl. The breather tube that is attached to this vent is generally routed to the still air in the frame cavity below the battery. Now we are experts on the Bernoulli principle we know that this is because air passing quickly over the end of the pipe could alter the pressure inside the float chamber and effect carburettion.
The next post describes how the main circuit of the carburettor works.
Fuel filter
some people like to install inline paper filters in the fuel hoses that supply the carb. I've not been able to uncover any convincing explanation on why the filter built into the fuel tap is not up to the job, so I've concluded these modifications are just introducing more things to go leak and go wrong. Your mileage may vary!
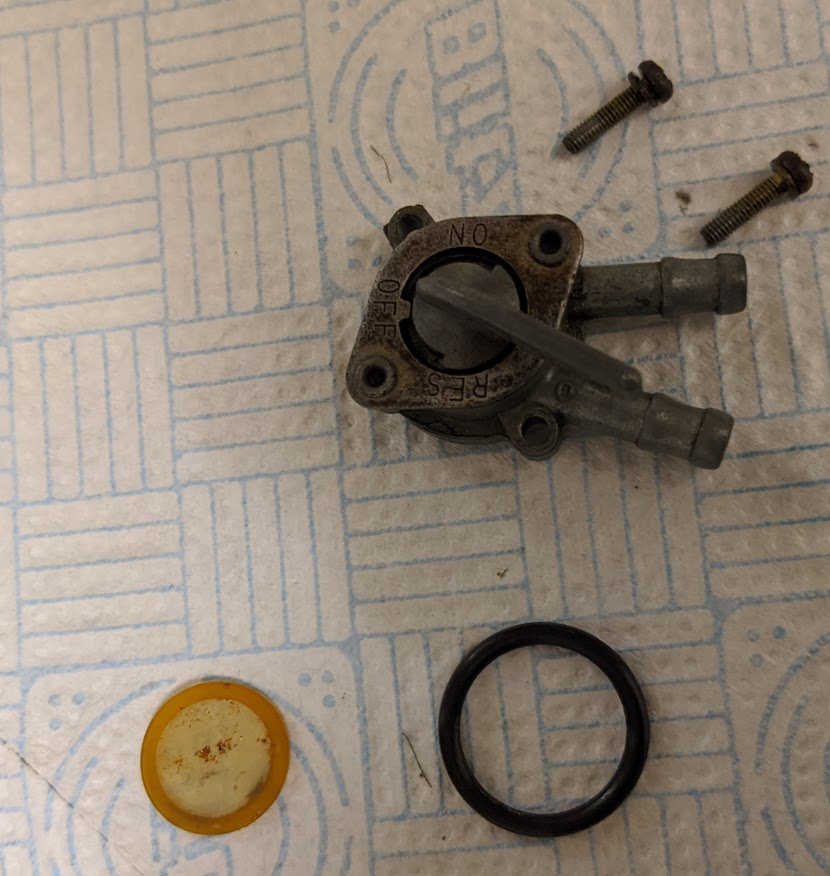
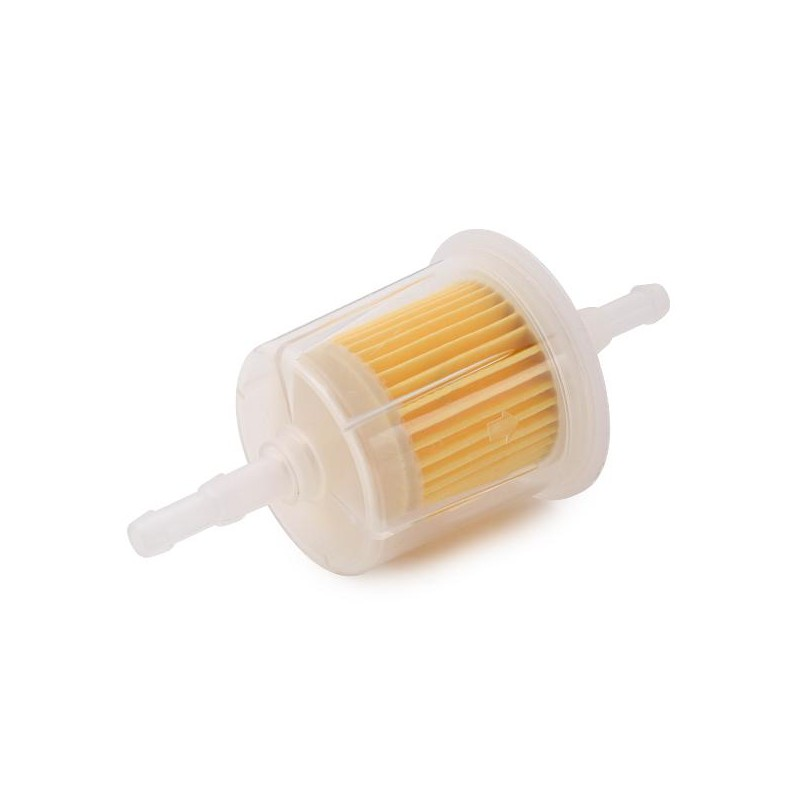
left: original Honda fuel filter (needs cleaning!) / right: inline fuel filter gizmo
Fuel cap
Note there are breather holes in the fuel cap to prevent a vacuum forming in the fuel tank. If the holes become blocked up this can cause the carburettor to be starved of fuel because the partial vacuum generated in the tank will slow down the delivery of fuel.
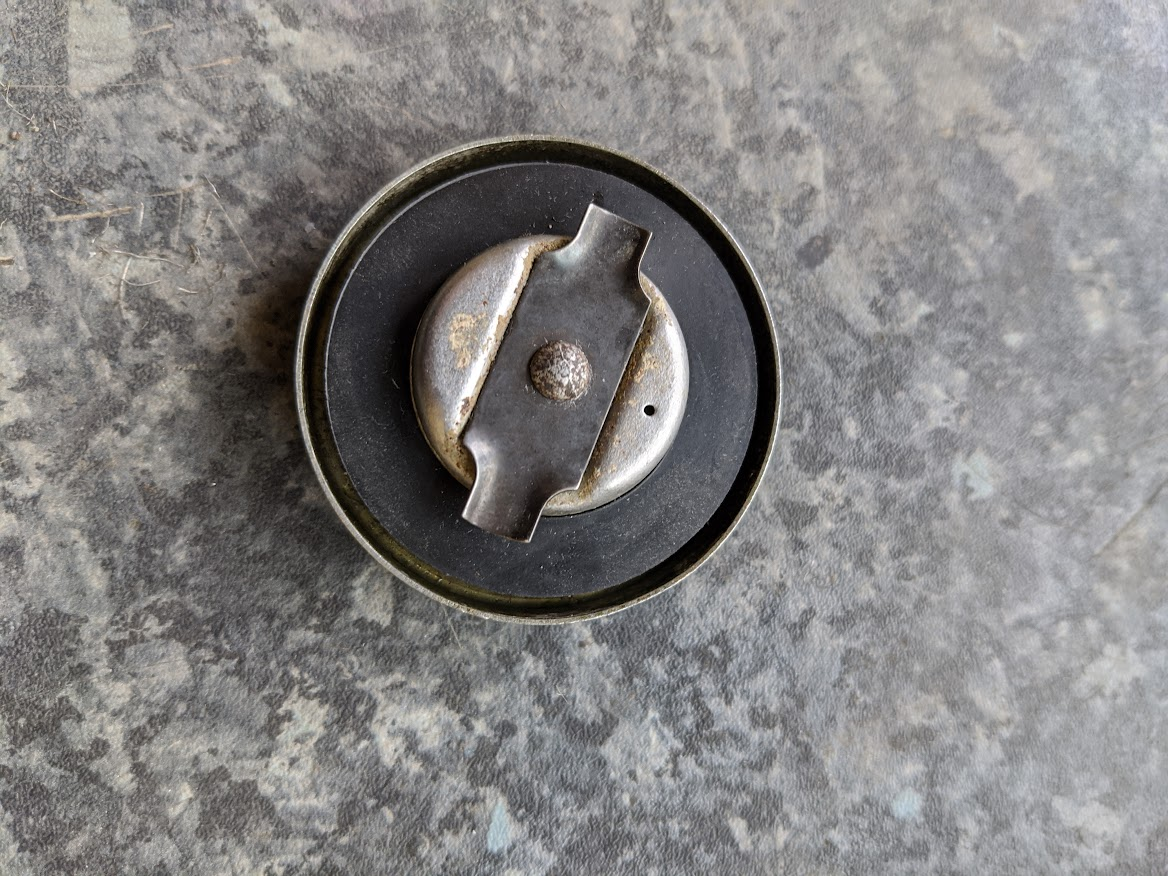
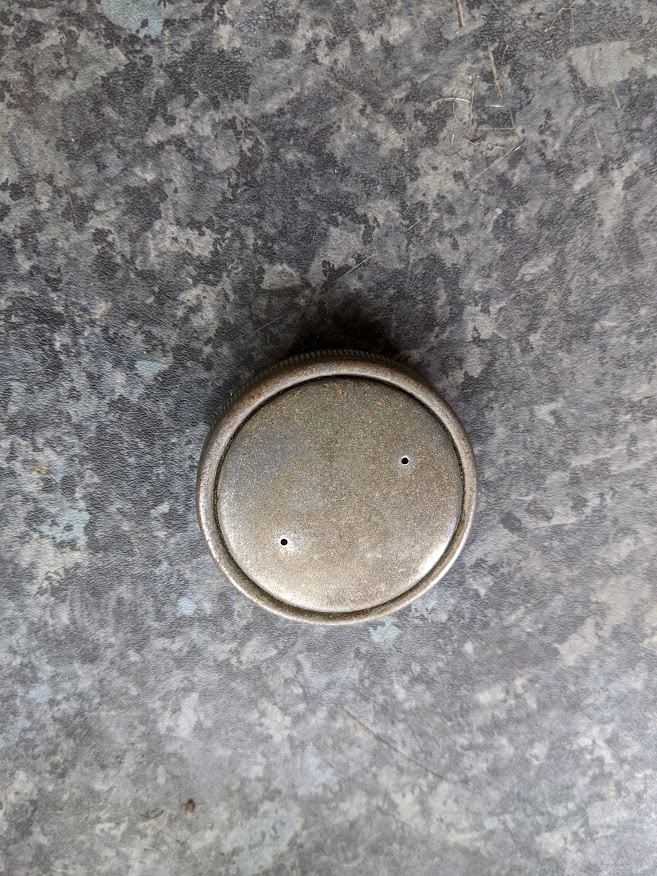
A common symptom of blocked breather holes in the fuel cap is that the bike will run for a few minutes, stall and then restart after a few minutes wait (by which time the float bowl will have refilled with fuel)
| 1⏎ | If this happens it can be very bad news for the engine since the diluted oil will no longer perform its job of protecting moving parts from wear. This is the reason most people turn off the fuel supply from the tank when their bikes are not in use. |
| 2⏎ | The C50z and C70z bikes from the 1970s used the same range of carburettors as the PB25A fitted to the C90z (PB40A and PB35A respectively), and the Honda workshop manual specifies 10mm float height for the smaller bikes, so I am pretty sure Haynes is right. . |